 "I certainly do," exclaimed Jack,
"You have helped me to understand
what each block must do and how they
work together as shown by the little
arrows. And the bullet statements
underneath each block are sure good
reminders of what the block must do.
"I certainly do," exclaimed Jack,
"You have helped me to understand
what each block must do and how they
work together as shown by the little
arrows. And the bullet statements
underneath each block are sure good
reminders of what the block must do.
David L. Pippen
dpippen@nmsu.edu
Klipsch School of Electrical and Computer Engineering
New Mexico State University, Las Cruces, NM 88005
Basic electronic rules of thumb are used to show how simple approximations can be
effectively used as initial estimates for component selection and transistor biasing in
circuit design. Components discussed include an LM555 timer, battery, capacitors, a
light emitting diode, resistors, a piezoelectric buzzer, and a Darlington transistor.
Electrical shock safety and circuit loading are also discussed. The reader is lead
through a simple circuit design process using dialog between professor Sam and his
engineering student, Jack, as they work together to design a proximity detector to be
used a a science fair electronic demonstration circuit.
Sam had just turned off his computer after having entered the test grades from this semester's first pop quiz. He quickly checked his watch to see how much of the ball game he had missed on TV and was relieved to find that if he hurried home, he could watch it from the beginning. He was about to open the door of his office, when he heard a tap on the door and the distinctive voice of Jack, one of his top electronics students, ring out,
"Professor Sam are you there?"
The momentary urge to keep quiet left Sam as he considered the urgency in the student's voice. He momentarily recalled his first day's instruction to the class when asked about what they should call him once they found out that he had not completed his PhD.. He had semi-seriously said, "call me professor, Call me mister, or call me professor Sam. But don't call me just Sam until you have earned the privilege by making a good grade in this class." And, he had really encouraged them to drop by his office anytime they had a problem of any sort that they thought he could help with.
"Why did I say that," Sam murmered as he joked with himself.
"Yes, I'm here.", Sam answered, with a mustered enthusiasm, as he opened the door.
"You've got to help me", Jack pleaded with a tone of undeniable urgency. "I've got a terribly urgent problem."
"Well come on in and tell me about it", invited Sam
In walked the tall and gangly young man with his blond hair pulled back into a short pony tail.
His body precariously brushed a stack of periodicals awkwardly balanced on top of his desk as he headed for the closest chair.
"Be careful there Jack," Sam said sternly, "It would take us a week to get those back in order."
Sam always had a tough time with the long hair, having grown up in the crew cut era. But as he saw this very bright and serious student, he had to suppress a chuckle as he remembered those in his generation who cut their hair in Mohawk indian style; head shaved with only a 2-inch wide by 2-inch long band of hair extending from between the eye-brows to the back of the head.
"This really looks better," he silently mused.
This sharp mandate about the magazines caused an obvious look of consternation in Jack's face causing him to blurt, "Oh, I can come back later. You seem to be leaving."
"Oh, I can hang around for a while longer," Sam said in a more subdued voice, realizing his sharpness might have put some fear into the teenager's heart. "Anyway, what's the panic?"
A look of concern swept across Jack's face as he began to tell his story.
"We have this group of prospective high school EE students visiting our electronics lab tomorrow and I volunteered to demonstrate a cool project they could build for their upcoming science fair. I agreed to do this since I have an electronic construction project kit I got for Christmas last year. But, I just found out that my roommate has carted off all the parts and instruction book!"
"Man, you are in a pickle," Sam replied in a soothing tone. "Do you have anything special in mind that you want to design and build?"
"Well, not particularly, but whatever it is, it has to be simple enough for me to build by myself before tomorrow and I must explain how it works to this group. I also need to show them that it works." My first thought was to use a transistor driven siren or something that will really get everyone's attention in the building." After a thoughtful pause while broadly grinning at his own joke, Jack lowered his chin in embarrassment when he realized Sam wasn't laughing at his enthusiasm for meanness.
He finally said, "Well, I really need to make an A in the course. The siren probably wouldn't contribute to that goal."
"Now, you're thinking like an engineer, " Sam replied, successfully suppressing a laugh.
After a brief thoughtful pause, Jack's head jerked up and with widening eyes, he said excitedly , "Hey, I remember having lots of fun with a burglar alarm thing in that project kit. If you walked close to it, a buzzer would go off."
"Sounds like a proximity detector to me," Sam murmered just audible enough for Jack to hear.
"A what?", quizzed Jack, realizing he had never heard the terms Sam used.
"A proximity detector.", stressed Sam. "A proximity detector is an electronic circuit that will cause a light to come on, a buzzer to buzz, or provide some kind of indication when someone gets close or touches it. You could make an interesting project by building one of these gadgets, placing a fifty cent piece on it and issuing the challenge that anyone could keep the money if they could pick the coin up without a light coming on or a buzzer sounding. How does that grab you?"
"That would be cool," exclaimed Jack excitedly, " and, I could even make money by charging them a quarter to try!"
"You would What?", exclaimed Sam with a mocked expression of shock. "That would work only if you split the take with me!"
They both chuckled at Sam's obvious joke. Sam removed a new chalk stick from a box in the chalk tray and handed to Jack.
"I'm going to settle down here in my easy chair while you do all the work on the board." Sam said, as he exaggerated settling into his office chair.
"But, I don't know how to start," exclaimed Jack with a slight nervous whine in his voice.
"Well, You won't learn any younger," Sam said, fully realizing from Jack's puzzled look that he didn't catch the humor intended. "Why don't you make a list of requirements. You want it to be very simple, easy to build, and use parts we have on hand. You don't have time to run all over town looking for some part that you find is unavailable."
"O.K.," Jack said with uncertainty in his voice. "What do you think I should write down?"
Sam sternly, but kindly replied, "Now remember, this is your project. If you really want to understand it, then it would be much better if you designed it. I'm just your helper. Let me ask you some questions and you write down the answers, O.K.?"
"O.K.," exclaimed Jack as he quickly stepped up to the chalk board, poised to write.
Sam directed, "Write the answer to this question. How close do you want to be to the coin to make the alarm go off?"
Jack replied with a broad smile on his face ," How about a mile?"
"Come on, get serious," Sam responded, with a grin on his face. "Now consider that the greater the range, the more difficult and complicated the design."
"Well, since that is the case, we can just let them touch it can't we? This is about as short a range as I can think of."
"Now you are thinking like an engineer with a short fuse'd design project! If your design has a little better range than this, it would be a plus, so this sounds like a good design requirement to me. Let's just have a metallic touch plate that the coin is placed on. The touch plate could then be the point of contact for a person acting like an antenna picking up 60 Hz that is radiating around in every building, especially in the vicinity of fluorescent lighting. So, when a person, touches the touchplate, 60 Hz is transferred to it. All you need to do is design an amp that will amplify this small 60 Hz signal, then trigger your timer to start."
Jack had the requirements listed on the board before Sam finished his sentence. Sam could sense Jack's excitement and confidence increase as he was thinking about the task at hand.
"I also want a buzzer to sound and some kind of light to light to shine .... and I want it to be pretty small, and solid state". Jack exclaimed excitedly, as one idea triggered the next.
"O.K., write these design requirments down in a column, one on a line. We will want to refer to them as we go along and after we finish to be sure our final design meets these requirements." Sam deliberately paused for nearly a minute, " You think these are all of the requirements?" breaking the nearly painful silence.
Jack slowly said, " well ..... nothing else comes to mind. Do you think I have them all?"
Sam replied, "Not really, there is at least one more important requirement that you must consider and that has to do with power. The electronic circuit you have described must have a battery or use the power available at a 120 VAC wall plug. The whole idea behind most electronic circuits is that you have a DC power source and then use various components to shape this DC into the AC signal you need. For example, an audio amplifier has a bunch of components that converts its DC power supply into a high powered wave form that covers the frequency range of about 20 Hz to 20 kHz."
Sam continued, "Would you care to guess which is best for your circuit?"
"Well.....," drawled Jack, "I'd rather use a battery because I'm afraid of the wall voltage. "I will never forget when I stuck one of mom's hair pins into a wall socket when I was a kid." It really scared me and it hurt. I've never been shocked by a battery!"
"Now safety is always a very important consideration." Sam replied, "but, in the old vacuum tube days portable radios used what they called B batteries with voltages in the 90 volt range if I remember correctly - and they could set you on your ear if you got across the terminals."
"Really?", Responded Jack, in amazement, "but a 9 volt one won't shock you will it?"
"Not generally, because of a person's normally high skin resistance. In fact there is a rule-of-thumb in industry that says voltages are generally considered safe to touch when 40 volts or less. Now, you must realize that very low voltages can kill if they can somehow bypass the usually high body skin resistance. The killer is the current, not the voltage. So if voltage is applied in a way that the necessary current for damage flows through the body, then you could be dead. This is why there is so much care taken in medical electronics where instrument probes can be attached using low resistance techniques or beneath the skin thereby bypassing the skin's relatively high resistance. It is reported that currents below about 1 ma produce no sensation whereas current in the 100 ma DC or 20 ma RMS range can be deadly. And, women are more sensitive to shock than men. The bottom line here is to be very careful around electricity, but either a battery or AC can be safely used with proper design."
Sam deliberately paused for a few seconds to let this dissertation sink in, then continued, "but, enough of this for the time being, let's get back to the problem at hand. You can use a battery, it will likely be easier to design and definitely easier to make safe since it will usually be much less than the 40 volt rule of thumb I mentioned earlier."
"Well," replied Jack. "I have a 9 volt battery, so maybe I should just use it,, O.K.?"
" That gets my vote," replied Sam, realizing his short safety lecture made the intended impression.
"What's next?" asked Jack who was obviously becoming impatient with overall progress of the project.
Sam's voice now became more serious, "Now I want you to conceptualize what you need based upon all the electronic courses you have had up to now", directed Sam, knowing the student had a basic knowledge of resistors, capacitors, switches, transistors, and had math through calculus.
"O.K." replied Jack, with heightening interest. "We need some sort of electronic switch to turn on the light and buzzer when the student is close to, or touches the coin and then some way to turn these indicators off when the touching ceases."
"Hey," I've just come up with another requirement, " Jack said with a repressed shout. " I want the indicators to stay on only for a short time ..... say, 5 seconds then go off automatically. This way we won't have to be pushing reset buttons all the time."
"You are really getting into this engineering thing correctly," praised Sam, "add it to the list before you forget it! And be sure and write down the battery as a power requirement."
Jack eagerly replied, "I'll write them on the board as requirements."
Sam nodded in approvement, "It looks to me like you have a good start on your design. It is very difficult to design something that doesn't have defined requirements. Also, remember that you want to use components that we have rather than something you need to buy, mainly because of the time factor. Now I want you to look at those requirements and tell me the kind of circuit functions you will need to meet them."
Jack replied,"well, we need some kind of transistor switching circuit to turn the indicators on, and a detector circuit to sense when the coin is touched." After a brief period of obvious thought, he continued, "and some kind of amplifier or something for the buzzer and light. Also, we need a 5 second timer to turn the indicators off.. What do we use for the light?" I have read that you can use light emitting diodes or the other kind. I read where they call them LED's."
" Right on with the LED's! " Sam replied, then pausing for a second, then continued,"I think you are referring to Incandescent lamps as the other kind."
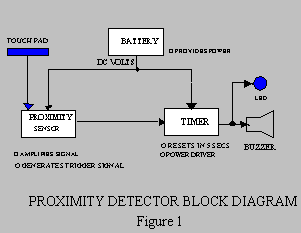
"Add a power supply to your concept and an LM555 timer for the 5 second time delay and you have a good start," Sam added. "Now, can you make me a quick block diagram of the circuit and arrange these requirements you have listed under each block?".
"Why sure," replied Jack, exuding confidence.
Jack began to draw the block diagram. After a minute or so with a lot of help from Sam, Figure 1 was generated. Sam also had him draw this diagram on a piece of paper for future reference.
"Do you feel like you can explain this block diagram to your class?" questioned Sam.
"I certainly do," exclaimed Jack,
"You have helped me to understand
what each block must do and how they
work together as shown by the little
arrows. And the bullet statements
underneath each block are sure good
reminders of what the block must do.
"Hey, not a bad idea, here, professor!"
Sam chuckled, "Well, being in the business for a few hundred years doesn't hurt. I think it's called experience!"
Then, more seriously, Sam exclaimed, "I surely am glad you are catching on to this stuff as quickly as your are, it means to me you are real engineer material." Sam quickly and inconspicuously glanced at his watch and thought, "Good boy, I still may make the last half of the game."
"O.K.," said Jack with a sigh relief, and obviously pleased with Sam's compliment, "what's next?"
For emphasis, Sam drawled slowly, " Now listen carefully" then changed to his normal speaking speed, "this may be overwhelming the first time we do it. Let's start at the outputs and work towards the input. This is usually a good thing to do because we know most about the so called load. In this circuit, there are two loads; the buzzer and LED. Both are already defined by their specs. I have a piezoelectric buzzer in the lab that draws a maximum of 10 milliamps and operates over a voltage range of three to fifteen volts. It sounds loud enough to get anyone's attention. Also, there is a ROT that states to bias a red, green, or yellow LED in a range of 10 to 20 milliamps."
"Excuse me professor Sam," Jack questioned, "what did you say ROT means?"
"It means rule of thumb. ROT's are general rules developed from theory, specifications, and experience that gives designers a place to start. In a lot of cases, components will operate over a wide range of conditions due to manufacturing tolerances, component physics, or whatever. If you use the ROT, then you can expect the component to work properly if you design to it, but it may not be optimal for a specific case. For example, take the LED. The specification sheet will give you a maximum LED forward average current which could be, say 25 milliamps. You don't want to operate at this current because it is a maximum rating. Operating at a max rating is comparable to running your car at full throttle all the time."
Sam continued, "so, where do you operate or bias the LED? Well, you can use the ROT and be reasonably assured it will operate reliably. If you operate at 10 mA, it provides less light output than if you operate it at 20 mA. But, the higher the current, the larger the battery must be and the length of service will be less. However, if you want to use the LED outside or under bright ambient light conditions, it must be brighter than if used inside where ambient light is usually lower. So, you as the engineer must consider the particular application and decide what current you are going to use.
"Now," Sam challenged, "give me your engineering assessment of what current you are going to use for your LED."
Jack was silent as he thought out this problem, then he cautiously began to vocalize his logic,"Since the circuit will be used inside and not outside, then the current can be on the lower side. However, I want to make sure that everyone can easily see it so I don't want to make it too low. But, the max current of the LED can be expected to be around 25 mA and we want to stay away from this ..... boy, this is tough. I really don't know, professor," Jack said with a hint of disappointment in his face and voice."
"Sure you do, Jack," encouraged Sam. "Your logic is good, now come up with a value."
"O.K.! I'll choose 15 mA?" Jack said hesitatingly, "what do you think about that value?"
"I think it is a very good answer and let's go with it. Remember, it is a ROT which means we can change the value if it needs changing later. But it is a good starting point and we can go on with the design.
Sam continued with emphasis, "You see, design is an iterative process, therefore, you will save time and effort if you make rough estimations at first, then change things later as the particular circuit design demands. Now in the case of the LED, you have set a current, but a voltage level is required to establish this current. We don't have to set the voltage at this time because all we need is a series current limiting resistor whose value is determined from the particular voltage you will establish later. Make sense?"
"Man, it sounds simple, but I don't know if I understand it completely," Jack said with a frown of disappointment.
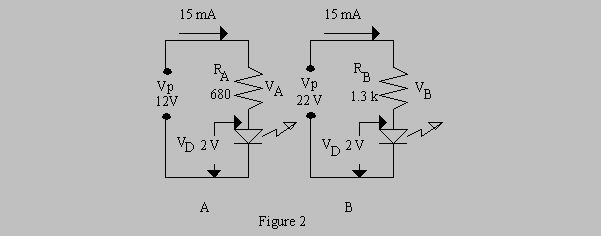 "O.K." replied Sam, "just draw a circuit on the board with an LED and resistor in series
connected across a 12 volt DC power supply. Next to it draw another circuit with a 17
volt DC power supply. Jack drew the circuit A and B shown in Figure 2. "Good, now
calculate the value of resistors required in each case for 15 mA of current flow through
the LED."
"O.K." replied Sam, "just draw a circuit on the board with an LED and resistor in series
connected across a 12 volt DC power supply. Next to it draw another circuit with a 17
volt DC power supply. Jack drew the circuit A and B shown in Figure 2. "Good, now
calculate the value of resistors required in each case for 15 mA of current flow through
the LED."
A puzzled look came across Jacks face,"I can't because I don't know the voltage drop across the LED."
"Great observation," complimented Sam, "What if I told you the ROT for the forward voltage across green, red, or yellow LEDs is 2 volts and for blue LED's is 4 volts whenever they are lit.?"
"Why, I'd be able to calculate it once I selected the color of LED I want, and I want a red one!" exclaimed Jack. "All I need to do is subtract the 2 volts from the supply voltage and divide this by the 15 mA!" Jack scribbled the above shown on the board, retrieved his calculator from his backpack, and solved them very quickly using the equations and values shown in Figure 3.

![]()
 "Good job, Jack," exclaimed Sam, "now use my DigiKey catalog to select the
resistors you would use. The 5% carbon film would do fine here since the value is not
value critical.
"Good job, Jack," exclaimed Sam, "now use my DigiKey catalog to select the
resistors you would use. The 5% carbon film would do fine here since the value is not
value critical.
"Would you round up to the correct value, or down to the correct value?" Sam asked.
"I would round the 670 ohm value calculated for RA up to 680 ohms and use the calculated value for RB because I had rather the current be a little smaller than larger!" beamed Jack showing confidence in his answers.
"Right on," said Sam, a little amazed at the insight the young student was displaying, "but you may want to consider rounding down just to hedge a bit on the brightness thing. But go with the larger value, it's your choice. We want to keep battery drain to a minimum."
Sam continued, "Now do you understand why we only need the current at this point?"
"Yes, I do, all we need to do is change the resistor to a value that allows 15 mA to flow through the LED," retorted Jack, "but why didn't we just use 9 volts since I decided that early on?"
"You could have. But I'm not sure at this point that a 9 volt battery has enough capacity to do your job. Let's just wait a while to make that determination."
Sam continued, "We know the current for the piezoelectric buzzer and the voltage range it operates over. So we just want to be sure that we select a DC operating voltage somewhere between 3 and 15 volts and can safely assume the current will be no more than 10 mA. The higher the voltage, the louder it will sound."
"Now let's consider the timer block. We can use an LM555 timer here. Pull that spec book out of the bookcase and let's figure out how it works." Sam said as he pointed toward the overcrowded bookcase.
Jack quickly spotted and pulled out the book and began searching for the index of components. With some help from Sam, he located it and drew the schematic pinout on the board as shown in Figure 4.
"O.K., there is the schematic and pinout, but how do I hook it up?", Jack questioned with a puzzled voice, "I've never hooked up anything like this before!"
"I don't guess you are going to learn any younger, so you might as well learn how now", said Sam in a joking voice.
"Notice that you have 8 pins on this DIP device. DIP stands for dual in-line package. You label the drawing as I call out the pin functions. Ready?"
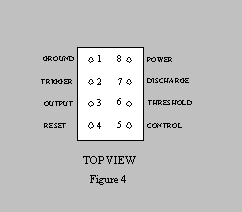 Jack replied eagerly, "I sure am!"
Sam reached for the data book and Jack automatically responded by giving it to him. Sam called out each pin and then spelled out how it needed to be annotated on the drawing.
"Now let me give you a quick lecture on how it works. I'll leave the data book open so we can find the specifications as we need them," continued Sam. "Let's refer to your drawing as I talk."
"I'm ready," replied Jack.
Sam talked slowly so Jack would understand, "The LM555 needs to have the proper operating DC voltage applied between VCC, pin 8 and ground, pin 1. Pin 4 is the reset pin. If you do not use reset, you can just connect it high to VCC and this enables the timer to work. If you need to reset the timer, then you must connect this pin to a voltage source less than about 1 volt, say ground. This disables the timer function. Pin 3, the output, is in position to sink current when it is reset which means that current wants to flow into the timer pin 3 from the load because it is low. A Low is around 0.5 volts but depends upon load current. When the timer is triggered, the output goes high thereby providing a source current to the load, meaning the voltage is a couple of volts below VCC. The trigger is applied to pin 2. Pin 2 is normally held at a value greater than 1/3 VCC, or, in other words, it is not being triggered. A good thing to do is just pull pin 3 up to VCC with a 10k - 51k resistor. When the trigger is lowered below 1/3 VCC then the chip is triggered and the output goes high.
"With me so far?" questioned Sam.
"I think so," answered Jack.
"Well, it will become clearer when we actually use it in your circuit," continued Sam, "Now I'll tell you about the rest of the timer operation."
Sam continued, " Now this is where the timing function comes in. Say we want to have a 1.1 second timing function, or in other words, we want the output pin 3 to go high when triggered then stay high for 1.1 second and return to the low condition."
"Why 1.1 seconds?" asked Jack with a puzzled look on his face, " The spec calls for 5 seconds!"
"Because it's easier to explain and I won't need a calculator to figure the values," replied Sam, "one needs all the help they can get when their mind gets old and tired."
"Now look at the spec sheet and tell me what the formula for time is," directed Sam.
Jack looked at the data book for the answer and was obviously puzzled by all the information he was looking at. After a minute or two of searching back and forth through the pages he said, "I can't find anywhere that it says!"
Sam replied, "Well, read what it says for monostable operation."
Jack began reading, "When a negative trigger is applied to terminal 2, the output goes high while the voltage across the charging capacitor, CT, is allowed to increase exponentially with time constant t=R1CT until 2/3 VCC is reached. At this time, the output goes low and remains there until another trigger pulse is received."
Sam responded, "Well, there you have it. All you need to do is solve the
equation ![]() with your handy calculator. Of course you are
going to solve for t in terms of RC."
with your handy calculator. Of course you are
going to solve for t in terms of RC."
Jack whipped out his scientific calculator and went to work. He entered 2/3 VCC for VC and noted that the VCC's canceled. Then took the natural log of each side. He soon came up with the answer, " Look professor Sam, it works out to be about t = 1.1 RC."
"Hey, not bad for an EE student," complimented Sam with an approving smile. "Notice that the equation is independent of VCC therefore, this time interval will not change even if different battery voltages are used. Now if we wanted a time of 1.1 second, all we need to do is make R equal to 1/C. We can choose just about any capacitor available and then calculate R. I chose the cap first because there are not as many values available for capacitors as there are for resistors, thus, we can get closer to the spec value of 1.1 seconds using standard parts if I do it this way. Now, If we select a 1 microfarad capacitor, then a 1 meg resistor would give a time interval of 1.1 second. See why I used 1.1 seconds for this example?"
"Sure do," replied Jack, "it's because you knew that the timing factor was 1.1."
A broad smile came across Sam's face as he said, "Knowledge can work for you in a case like this, huh? You notice that I didn't have to calculate anything to get the answer. It is easy to get so involved in the math that you lose sight of what you are really after. You must also realize that the actual time you will get from your circuit will depend upon the tolerance of the components you select. Capacitors have precisions of about 20% and resistors either 5% or 1%."
Sam continued, "You can now draw a schematic on the chalk board and use this equation to set up your buzzer to be on for 5 seconds. All you must do to finish the 555 circuit is to determine a battery voltage and how to trigger it. If you select the battery to be within the voltage range required to operate the buzzer then you can connect the buzzer directly to the 555's output as long as its current demand doesn't exceed the timer's output current capability."
Jack quickly went to the spec sheet and confidently exclaimed, "See here, the max voltage for the 555 is 15 volts and max current is 200 mA. So we can just choose a battery of 9 volts but must make sure it can deliver the 10 mA required by the buzzer plus 15 mA for the LED for the length of time we want the battery to last. The 555 can easily handle these values. So, I was right in selecting 9 volts. This is good because you said once not to operate components at max rating."
"Good engineering and a good memory, Jack," praised Sam, "But will your battery have enough capacity to run your circuit as long as you want before having to replace it?" What is the total time that the LED and buzzer will be on?" Sam continued, "consider that you will draw 15 mA for 5 seconds every time someone tries to pick up a coin. Make your estimation in milliamp hours; that is determine how many hours you expect the light and buzzer to operate and multiply that times the current draw while operating."
"Well, drawled Jack, as he looked at the ceiling in obvious concentration, " we will run it all day Saturday. I expect it will run continuously for most of the day. So 8 hours times 25 A equals 200 mA hours."
"Now," directed Sam, "get that Horowitz & Hill book out of the bookcase and look up batteries and see how many mA hours a 9 volt alkaline will deliver."
Jack quickly located and pulled the book from the bookcase. He then went to the index under batteries and found the page. Soon, he found what he was looking for.
"Here it is," exclaimed Jack, "It says here that it will deliver 470 mA hours when loaded to 10 mA. It also says it will deliver 280 mA hours at 100 mA. Since we need only 200 mA hours at 25 mA, it should work for nearly 2 days."
"You are right again," retorted Sam," even though battery capacity changes according to load, you are going in the right direction. I mean that since you are drawing considerably less than the 100 mA, you will certainly get two, eight hour days out of it. It looks like you made a good guess, huh."
Jack gloated, "No guess here, professor Sam, I just knew it would work."
Sam allowed his chance to scold the student slip by as he thought, "No need to get into a discussion about guessing at this stage, I'm going to miss the entire game for sure!"
"Now that you have selected the battery you will use, you can calculate the value of resistor you need for the LED. Remember that when the 555 timer goes high, that it's output will be about a volt lower than the 9 volt power supply. And, while you are at it, just go ahead and calculate the value of C and R to give you the 5 second time delay. Before you do all this, draw a schematic on the board. I need to go down the hall for a few minutes. I expect you to have the timer all designed by the time I get back."
Jack began drawing the schematic on the board. He drew a box and labeled the pins with the functions. Recalling a few pointers Sam had given him before he left, he drew the input on the left and output connected to the LED and Buzzer. He calculated the value of resistor needed for the LED using the formula in Figure 3. He rounded up the calculated value and placed it on the schematic. He then calculated the values for the timing capacitor and resistor and selected appropriate values from the catalog. He connected Vcc and ground, as well as the other pins as appropriate.
"Pretty good going even if I do say so myself," Jack muttered as he settled down in Sam's chair. "I'd better draw this schematic in my notebook too so I can build it later."
Sam returned in a few minutes to find the schematic drawn on the board as 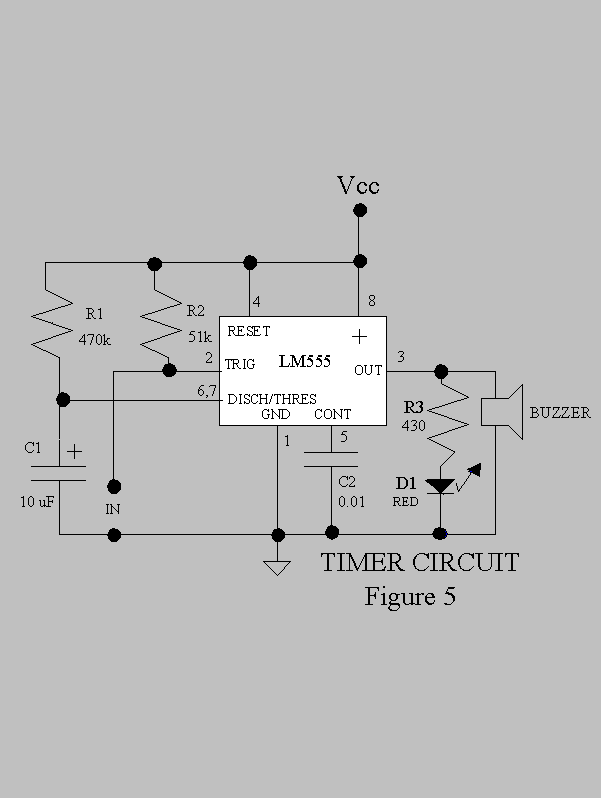 shown in Figure 5
"O.K.", said Sam obviously pleased with the schematic. "Now, you must tell me how it works and what kind of input signal you need to trigger it. Just reiterate how you came up with the component values and stuff."
"Well," Jack began, " first we must apply power to pin 8. We decided a while back that 9 volts would be a good design goal. Then we must ground pin 1 to complete the power circuit. The spec sheet indicates that capacitor C2 is used to filter any noise that might be picked up by the control pin 5. This capacitor may not be needed, but we might as well put it 0.01 uF in there so we don't have to worry about noise causing time out problems. R1 and C1 were chosen to provide about 5 seconds of time delay in accordance with the t = 1.1 RC formula we arrived at earlier. I selected 10 microfarads because it is a standard value and will not cause R1 to be larger than the 1 megohm rule of thumb we talked about. Since Vcc is 9 volts, a 16 volt rating will be fine. This value of capacitor requires a 454k resistor for a t = 5 seconds, but this is not a standard 5% value so I rounded up to the 470k. This will increase the 5 second time, but it's not that far off. Since the circuit will automatically time out, I didn't need to put a signal on the reset pin 4, so I tied it high to Vcc. I connected the discharge pin 7 to the threshold pin 6 because the spec sheet said this is required for the circuit to operate in the monostable mode. The circuit will have to be triggered by a signal applied to the trigger, pin 2, that will lower it below 1/3 Vcc. This value is 3 volts. I calculated the LED series resistor value by allowing the timer to drop one volt and the LED to drop 2 volts. Therefore, I subtracted 3 volts from the 9 volts and divided this by the 15 mA of LED current. This calculated to be about 400 ohms, but I used a standard 5% resistor of 430 ohms. This resistor uses a little less current so the battery will operate a little longer. A 1/4 watt will work here and for all resistors. I connected the buzzer directly to pin 3 since it can operate directly on 9 volts. The timer will source, or supply voltage to the buzzer and LED when pin 3 goes high. I just put a 51k pullup resistor on pin 2 since I didn't know what else to do."
"Whew!", sighed Sam, "you really went through that thing like an engineer should. Now I want to be sure you understand the 1 megohm ROT that you mentioned."
"That's easy," replied Jack with confidence. "Since measuring instruments like a scope or voltmeter usually have an input resistance of 10 megs or higher, we want to keep resistors in our circuit to 1 meg or lower to minimize reading measurement error. This 10:1 ROTwill give us a maximum 10% measurement loading error since the resistance of the instrument is in parallel with whatever it is measuring."
Sam then asked another question, being sure not to alert Jack to the trap he has just set, "What is the resistance of an oscilloscope probe?".
Jack replied, "Well, I noticed the ones in the lab have switches with 2 positions, 1X and !0X. And you told me in lab that the basic input resistance for most scopes with no probe attached is 1 meg. If you put the switch in the 1X position, then the scope loads the circuit with 1 megohm and if it is in the 10X position it loads the circuit with 10 megs."
"Boy, you are good aren't you?" replied Sam in a mocked astonished voice, " and I thought your weren't even listening in class." Sam continued, "OK, how long would your buzzer sound if you connected the scope with the 1X probe to the pin 6,7 node?"
"Well let me just figure that out," replied Jack, "I don't think it would matter much. I use the 1X probe all the time because it makes the signal bigger."
Jack began to rapidly punch the buttons on his calculator as he mumbled his calculations. " Now, when I attach the scope to the node at pin 6, 7 the timeout of the circuit would be decreased because the R in the t = RC equation would no longer be 470k, but would now be equal to 470k in parallel with the 1 meg scope probe resistance. Now, solving for t with the new value of R gives about ...., let's see," Jack mumbled aloud as he punched the numbers into his calculator, " 470k in parallel with 1 meg is about 320k, then plugging this value into the t = 1.1RC equation with C = 10 uF's gives us .... wow!" Jack exclaimed, " look at this, Professor Sam,!", Jack thrust the calculator into Sam's field of view, " the 5 seconds changed to about 3.5 seconds!"
"Sure does", exclaimed Sam. "What does this tell you about attaching instruments to test you circuit?"
Jack began, still amazed at the revelation, " Well, you'd better be very careful to make sure your instrument resistance is at least 10 times the circuit resistance you are measuring or you will get a lot of error. The 10 times would give 10% error and that seems like a lot of error to me."
Sam realized he now had jack's attention so he wanted to really press home the instrument loading concept, "OK, then what would be the loading if you used the 10 meg switch position on the probe?"
Jack quickly redid the timing figures using 10 megs in parallel with the 470k. " It looks like it wouldn't change the time much, only to 4.9 seconds. This is no big deal, huh?"
Sam replied, "Probably not for your circuit, but it would if the circuit required very accurate timing and you wanted to monitor the timing circuit at the this node. For sure you would want to use the 10X probe wouldn't you?"
Jack quickly replied, "I surely would. In fact, If I wanted to be sure there were no scope loading for the 1X probe, I would change the capacitor value to 100 uF and reduce the resistor to 4.7k. The buzzer time would be the same but the 1X probe would then load the circuit just like the 10X does this one."
"You certainly have that right," said Sam as his voice changed to a cautioning tone, "but you must be also be careful when using large capacitance aluminum electrolytic capacitors because they can have can have a significant amount of leakage current that can be represented by shunt resistance. This resistance is effectively in parallel with the timing resistor and also forms a voltage divider at the pin 6,7 node. If this so called leakage resistance is less than 2 times R1, then the timer will never time out. This is because the voltage at the pin 6, 7 node must reach 2/3 Vcc for the timer to reset. This can be a problem if you try to use the timer for very long timeouts by making both R1 and C1 large. Just look at your electronic catalog for a second." Sam paused as Jack picked up the catalog. "Now look at a 100 uF aluminum electrolytic capacitor. I just happened to have a marker at electrolytic capacitors. Now choose one."
Jack opened the catalog to the marker. A shocked look came across his face as he exclaimed, "Wow, just look at all these capacitors. How in the world do you ever know which one to select?"
Sam quickly glanced at his watch. It was half time. He knew he was going to have a hard time winding this project down even before the end of the game.
Sam replied, " That's a subject for another session. For now just select the 100 uF capacitor you would use for a timing circuit. Of course, you will need a voltage rating greater than the Vcc you will use for the circuit. You said this would be 9 volts if I recall correctly."
"That's right," said Sam, as he looked at the catalog. "I think I will select this one that's rated at 16 working volts."
"O.K.", replied Sam, "that's a good choice. Now, calculate the approximate worst case resistance of that capacitor by dividing the working voltage by the maximum leakage current."
"Will do, I've got my trusty calculator right here," said Jack as he began voicing his calculation,"Let's see, the working voltage is 16 volts and I want to divide that by the maximum leakage current which is 4.2 microamps. That equals 3.8 megohms. Does this mean that the timer will not work at all if the R is less than about 7.6 megohms?"
"That's exactly what it means", retorted Sam, " In fact, you cannot use that capacitor for time intervals greater than 1.1 times 7.6 megs divided by 2 x 100 micros equals about 400 seconds. This is only about 7 minutes!. This means that R1 could never be greater than 7.6 megs divided by 2 which is a little less than 4 megohms."
Sam continued, " This is farther aggravated by the fact that the equivalent R1 is 7.6 meg in parallel with the real R1 which is about 4 megs for maximum possible time interval. This makes the time even shorter, even if it did happen to work. The real time interval, if the timer worked at all, would be closer to 1.1 times 4 megs in parallel with about 8 megs which equals about 5 minutes. So, now look at the spec sheet and tell me what it says about time intervals for the 555."
Jack, now eager to solve this puzzle, quickly retrieved the spec sheet, " It says the timer can be used for time intervals ranging from microseconds to hours," he paused a few seconds then continued, "man, they lie like a rug!"
Sam uttered a chuckle that indicated obvious agreement but said, "Well, I wouldn't go that far. It's really not the timer's fault. The problem is with the support components. If you could find a capacitor with no leakage current, then the input resistance to the pin 6,7 node would be the limiting factor and it could provide a very long time interval."
Sam continued, " Now what message do you get from this, Mr. designer of timer circuits?"
"You just gotta know what you're doing when you use these parts or you could really get yourself in trouble, especially just reading the spec sheet and thinking that what they say can be readily realized."
Sam quizzed, "So you think you have a better handle on the ROT we started out with?"
"Do I ever!" replied Jack with a sincere voice. "But I've learned a lot so far. I've learned that you must be careful when you attach an instrument to your circuit and you had better know something about basic components like resistors and capacitors if you want your design to work."
"Well spoken," Sam exclaimed, "but, one important thing about a 555 that I need to tell you before we go on to the rest of the design," retorted Sam. "As I told you earlier, the timer will trigger when pin 2 is lowered below 1/3 Vcc. But what happens to the time interval if this voltage is not increased above this value before the 1.1 RC times out? Well, the timer will remain high until this voltage rises above the 1/3 Vcc thereby giving a timing error. For example, if the 1.1 RC has timed out, and the pin 2 voltage is below 1/3 Vcc for another 2 seconds, then the output will remain high for 2 seconds longer than it should. However, after 1.1 RC seconds, as soon as Vcc rises above this voltage, then the timer output will go low."
As Sam looked at Jack and was convinced he had at least grasped the main concepts of what he was talking about, then continued, "We need to spend a little time on the 51k pullup resistor you selected. The only problem with it that I can see is that since it will be the load for the transistor amp stage preceding the timer stage, it might be too large a value. You will probably use a common emitter configuration for your amplifier. As a ROT you can consider the output resistance of a common emitter to be equal to the collector load resistor. This is because the collector circuit is essentially a constant current source, thus, the resistance is ideally infinite, but practically it is just 'very high'. Thus, the collector load resistor is effectively in parallel with it. If the collector resistance is much greater than the load resistance, then the load resistance predominates and you can use the ROT. However, if you get the load resistor too large, then the parallel combination of the two resistances will actually lower the total output R and will effectively decrease the voltage gain of the stage. Just keep this in mind when we design the amplifier stage.
Sam paused for a moment before continuing, "We must get on with this design if we intend to get through in time for you to build it. All we need to do now is design an amplifier that will amplify the noise signal present when the touch plate is touched to a large enough signal to trigger the timer."
"I really don't understand what you're doing now," retorted Jack with a grimace, "where does this "noise" come from?" Jack gestured by placing marks with his fingers in the air around an imaginary word, 'noise', suspended in space.
Sam replied, " There is all kinds of noise and signals floating around in the atmospheric space. In inhabited space areas using wall power, the predominant frequency is usually 60 Hz. To see this, all you need to do is touch with your finger an oscilloscope probe. Set the vertical sensitivity at about 1 volt/division and the sweep speed somewhere around 5ms/division. You will see a rather large - perhaps 5 volts peak to peak - 60 Hz signal on the scope when you do. Your body has acted like an antenna and you connect it to the scope when you touch the probe. Now, the scope has a high input impedance so it is very sensitive to this noise pickup. The signal will not be as large for our circuit since we will be using a bipolar junction transistor as an amp. The BJT has a relatively low input impedance so it will "load" the noise signal down to a smaller value. If we can get the input resistance to the BJT up to around 100k, then we can expect to pick up at least 10 to 20 mV of 60 Hz at the base of the transistor if we touched it. Now, tell me how much gain the amplifier must have in order to trigger a 555 timer hooked to its collector."
"Well," Jack mumbled as he reached for his calculator, " since we must lower the timer trigger signal to lower than 1/3 Vcc, this means the output signal must be lower than 9 x 1/3 or 3 volts to trigger the timer. Thus, the signal change must be 9 - 3 = 6 volts. If we have an input signal of 10 mV then the gain must be 6 volts or 6000 mV divided by 10 mV which equals 600."
"That's real good," replied Sam. " The problems are getting the input impedance up to 100k and getting this high of gain out of a transistor and maintaining temperature stability. If we had a nice MOSFET it would be real easy since their input resistance is in the multi-megohm range and they are not as temperture sensitive as the BJT, but I don't have anything in the lab but power types and their gain is usually the highest with high drain currents. And they are physically large. Thus, we will have to use the next best thing which is a small signal Darlington transistor pair."
"A what?" quizzed Jack, "I've never heard of a Darlington BJT. How does it work?"
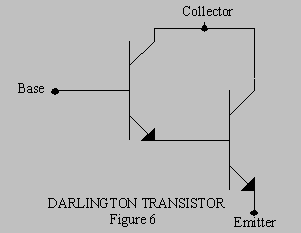 Sam slowly got out of his chair and took a piece of chalk and quickly sketched
out the transistor symbol shown in
Figure 6.
Sam slowly got out of his chair and took a piece of chalk and quickly sketched
out the transistor symbol shown in
Figure 6.
Sam began to explain, " Now note that a Darlington is just a particular way of connecting two transistors together. In this arrangement, the total current transfer ratio, or beta as it is frequently called, will be the product of the beta for each transistor. Beta's can exceed 10,000 for this arrangement as compared to about 100 - 200 for regular low signal BJT's.
Sam continued, " The big thing that this does is to substantially raise the input resistance of the transistor. For example, Let's assume you had a 100 ohm emitter resistor in a regular transistor that has a beta of 100. Well, the ROT for input resistance of a common emitter stage is beta times the value of emitter resistor. This would equal 100 times 100 or 10,000 ohms. This is nowhere near the value of 100k that we need to develop the noise signal. Thus, if we used it we would expect the 60 Hz noise we want to amplify to be loaded significantly; perhaps to no more than a millivolt or two. This would mean we would need two stages or more to get the output signal level we need.
Sam continued, "Now, lets go through the same estimation for the input resistance for a Darlington arrangement. Can you figure it?"
"Sure," replied Jack with confidence," Just multiply 100 times 10,000 and you have it." Jack paused briefly, "Wow! Do you mean the input resistance for this arrangement is 1 megohm?
"That's what it means," retorted Sam. "Now will it load the noise signal we want to amplify?"
"Why, no it won't," replied Jack in amazement, " wouldn't the lighter loading cause the noise signal to be higher than what you said before when loaded with 100k?"
Sam quickly answered, "That's right, but since we need to bias the transistor, we will necessarily lower the resistance as seen by the noise signal as you will see when we bias the transistor."
Sam continued,"I'm going to show you an easy ROT way to quickly bias a transistor that works as well as any method you have learned formally, although it may not be optimum for a particular circuit. What I want you to do is draw a Darlington on the chalk board and connect its collector to the timer pullup resistor that you have drawn. Draw in your normal base pull up and pull down resistors as well as an emitter resistor. I will then give you some design ROTs you can use to produce a temperature stable design that will allow you to interchange the transistors and still remain biased at the same point."
Sam slowly rose from his chair and went to the board and began to speak again, " There is another thing we need to discuss and that has to do with the 51k transistor load resistor. Remember before I said your selection of the timer pullup resistor may be too large?"
Jack replied, "I sure do. Now how do I know if it is too large or not?"
Sam began writing on the board, " The ROT for the output resistance of a transistor stage is the Early voltage divided by the collector current. If you looked at the characteristic curves of a transistor, it would be the slope of one of the collector voltage versus current curves. Typical values of Early voltage for discrete BJT's range from 100 to 500 volts. The collector current is wherever you bias it to. With your 51k resistor, and assuming you bias the collector at 4 volts, then the collector current would be 5 volts divided by 51k which equals about 0.1 mA. If the Early voltage for your particular transistor were 100 volts, then the output resistance of the transistor itself would be 100 divided by 0.1 mA equals 1 megohm. If it were 500 volts it would be 5 megs. Thus, the 51k will be predominant when in parallel with 1 meg even though the new load value will be less than 51k by about 5%. For the 500 volt case and 5 meg output resistance, the parallel combination would be within about 1% of the 51k load resistor alone. In either case, you would be O.K. because you not only do not know the exact Early voltage, you do not know how much noise you have. The worst thing that could happen is that your gain would be about 5% lower than you calculate it to be.
Sam continued to go over the circuit on the chalk board with Jack. With a lot of help from Sam, Jack produced the drawing shown in Figure 7.
 When they finished the schematic, Sam sat back in his chair and gave the chalk
to Jack.
When they finished the schematic, Sam sat back in his chair and gave the chalk
to Jack.
"O.K. buddy," challenged Sam, "explain how it works and why you selected the components you did," he paused for a moment, "just like you are going to do for those high schoolers this Saturday."
"Well, I'm not sure I have it all, but here goes," retorted Jack as he turned and pointed to the schematic on the board. He used a piece of chalk to point to each component as he discussed them. " First, the chip power is applied between pin 8 which is plus, and pin 1 which is minus or ground. To describe the actual circuit operation, I will start with the load which is connected to pin 3 of the LM555. There are two loads connected to this pin; the LED and the buzzer."
Looking directly at Sam, he continued, " Since the LED can only take about 2 volts and I wanted it to operate at 15 mA, I needed to put a resistor in series with it to drop the excess 6 volts and limit the current as we figured previously. "Since the buzzer can handle up to 15 volts, no voltage dropping resistor is needed."
Jack pointed toward the circuit components drawn on the chalk board, "The 555 output will go high when pin 2, the trigger input, drops below 1/3 Vcc or in this circuit, about 3 volts. This pin is held at above this voltage by the collector of the Darlington. Once triggered, the timer output will go high for 1.1x R4x C1 which is about 5 seconds as long as the trigger voltage rises higher than 1/3 Vcc before the timer times out. C2 on pin 5 is just a noise suppressor and the reset pin 4 is held high all the times because I don't need the reset function for this circuit. If it were held below 1 volt, the timer would not time out since it would be reset.
Jack relaxed and paused for a few moments as he realized he really understood the circuit better than he thought, and then he continued, " The Darlington circuit is next. It is configured as a class A amplifier which basically means collector current flows over the complete cycle of the input signal. Resistor R1 and R2 are used to establish the bias point, or in other words, the collector DC voltage with no signal applied. Note that R1 is a 1 meg potentiometer. This variable resistor will allow me to set the collector voltage level which is the trigger signal for the 555. As the potentiometer resistance is increased, the transistor will draw less base current which will cause the collector voltage to increase with respect to ground. This places the 555 trigger pin at a higher potential, therefore, a larger noise signal will be required to trigger the timer."
Jack Continued, "R3 provides the pullup for the 555 and as a load resistor for the collector of the Darlington. R5 is an emitter resistor that provides a little temperature stability plus makes it easy to apply the transistor voltage gain ROT. The touchpad provides a place to put the coins. As we discussed earlier, I will use a 6-inch by 8-inch piece of single-sided printed circuit board for this part. When it is touched, the noise which is mostly 60 Hz, picked up by the human body antenna will be transferred onto this touchpad and then coupled directly into the base of the Darlington to be amplified. I expect the transistor gain to be lower than I calculated but this is O.K. since I can adjust the potentiometer until the collector current is very near the 1/3 Vcc timer trigger voltage requirement. Thus, instead of a requirement for a gain of 600, the real requirement could be as low as around 100. I calculated this by estimating that only a 1 volt change at the collector is actually required, thus 1 volt divided by 10 mV equals 100.
Jack took a deep breath and exhaled slowly, "That is how all the circuit components work."
Jack paused a moment and looked at Sam. He noticed Sam's grin of approval and was relieved that Sam had not seen the need to interrupt him thus far.
Sam took this opportunity to break into Jack's dissertation. "I would like for you to describe how the signal triggers the 555. It is important for your guests to see what will happen when someone tries to pick the coin from the touchpad. Can you explain this?"
"I think I can," replied Jack, "how does this sound?"
Jack began, "Conducting coins such as pennies, nickels, or whatever, are placed on the circuit board before the game begins. They can be placed anywhere on the copper that covers one side of the printed circuit board material. This board is connected to the base of the Darlington transistor. Now it is important to adjust R1 until the voltage on pin 2 of the 555 is just above 1/3 Vcc which is 3 volts. This setting can be easily set by adjusting the value of R1 until the LED and buzzer come on and then readjusting the opposite direction until they just cease to operate. Then any noise signal generated by touching the plate that causes the voltage to drop lower will trigger the timer. Since the noise signal will be predominately 60 Hz, then it will be the negative half cycle of noise at the collector that will trigger the timer. The positive half cycle will raise the voltage above the trigger level as will discontinuing to touch the pad. These actions will allow the timer to begin the 5 second time out. When triggered, the 555 output will go high, causing the LED to light and the buzzer to sound for the 1.1 RC duration even though the trigger signal increases on pin 2."
Jack paused a moment, "That's how it works, is it clear?"
 "Man, yes," Sam replied in a complimentary tone. "This circuit should work like a
champ. Make a quick check to be sure it meets all the requirements that you made at
the outset of this design."
"Man, yes," Sam replied in a complimentary tone. "This circuit should work like a
champ. Make a quick check to be sure it meets all the requirements that you made at
the outset of this design."
Jack quickly compared the written requirements to what he expected the circuit to accomplish, then said, "It meets them all as far as I can tell."
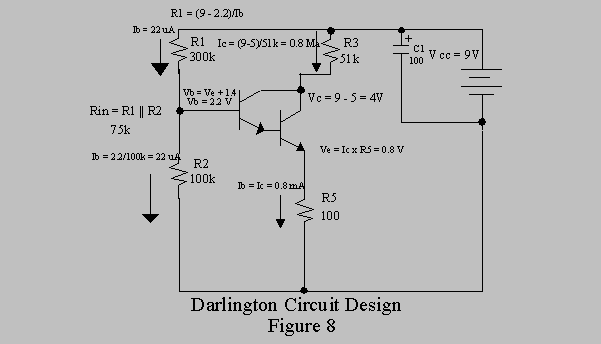
Good, replied Sam with satisfaction, "All you need to do now is get a prototype board and get to work building it. But I would like to see if you understand how we biased that transistor. Can you quickly explain that to me quickly? I am especially interested in the ROT's you used."
"I can do that," replied Jack with confidence as he sketched Figure 8 on the chalk board beside the complete schematic, "there are several things that I think are very important. One is to realize that the base bias resistors R1 and R2 establish the interchangeability of transistors. That is to say that proper selection of these resistors assures that the circuit is reasonably beta independent. The ROT associated with their selection establishes transistor interchangeablity. If you want to be able to place essentially any transistor of the same type in the circuit and be assured it will work then make the parallel value of R1 and R2 at least 10 times smaller than the input resistance of the transistor. Of course this lowers the input resistance to the amplifier which may cause the circuit driving the amp to be excessively loaded. This is why we went to the Darlington arrangement. The Darlington can have a very large beta, which means R1 and R2 can be much larger than for a conventional BJT with betas around 100 or so."
Jack looked at Sam for approval, and Sam obliged him by nodding his head in agreement.
Jack then continued, " Another ROT is that the input resistance of a BJT transistor is about beta times the resistance in the emitter. In this case, I arbitrarily selected the emitter resistor R5 to be 100 ohms. I used this value because I wanted R1 in parallel with R2 to be about 100k. Remember that is the value of input resistance we wanted in order to develop the 10 mV noise signal. This is where another ROT comes in. It says that the voltage gain of a BJT can be estimated by dividing the collector resistance value by the emitter resistance value. You will recall that we calculated the need for a gain of about 600 for the stage and I arbitrarily selected the pullup resistor for pin 2 of the timer to be 51k. It wasn't really arbitrary, since that I knew I needed very high gain. This means that the collector resistor has to be large, and the emitter resistor small. I remembered that have large collector load values can cause trouble due to the collector resistance of a transistor, but we determined previously that this wouldn't be a significant problem. Thus, if we divide the 51k collector resistor by the 100 ohm emitter resistor, we get a voltage gain of 510. I assumed that this was enough gain because the signal strength was only an estimate and we used a much larger collector voltage swing requirement than is necessary since we decided to make the trigger static voltage level adjustable.
Jack cautioned, "Now the 100 ohms violates the ROT for temperature stability of a Darlington. This rule says, for a Darlington, we want a quiescent voltage of about 2 volts to be developed across R5 with no signal present. It should be about 1 volt for a regular BJT. Our maximum voltage across the emitter resistor, R5, will be when the collector voltage is the lowest which is when the transistor is conducting the hardest. This will be about 5 volts DC with some ambient noise riding on it due to stray pickup. If we subtract Vcc from 5 volts, this will be the voltage dropped across the 51k resistor, R3. Then the collector current - which is close to the emitter current - will be about 9 volts - 5 volts divided by 51k which equals 0.8 mA. This causes a 0.8 mA times 100 ohms equals 0.08 Volts DC at the emitter which is much less than the ROT value of 2 volts. I figured this was O.K. because temperature in this application is not a problem since the circuit will always be used in an airconditioned room at essentially constant temperature and if I make this resistor as large as it needs to be to develop 2 volts, then the stage gain would be very small; not nearly the 510 that I calculated."
Jack paused and then asked,"Is this a good decision, professor Sam?"
"I would say your reasoning is excellent," retorted Sam." Your temperature assessment is cool," chuckling at his temperature joke, " and besides, ROT's are just starting points. You can change them when circumstances dictate just as you have done. The main thing is to understand the effects of what you are doing."
Jack smiled as he continued,"Once the emitter resistor has been established, I can calculate the Darlington's input resistance like I did before. I looked in the catalog and was amazed to find that the minimum beta of the 2N6725 Darlington transistor is 25,000. Calculating the input resistance by multiplying beta times this value gives 2.5 megohms. Wow!, this is high, which is good since I can set the value of the R1 in parallel with R2 to one tenth of this value which is 250K. Rather than calculate all this out, I estimated that R2 could be the standard value of 100k. Once this is done, it is an easy matter to calculate R1 since we know that the base of the Darlington will be about 2.2 volts and we have 100k from base to ground. This means approximately 2.2 volts divided by 100k equals 22 uA will flow in R2. Since the base current is much less than this we can ignore it and assume that the current through R1 is the same as through R2. Then R1 is equal to the voltage drop of 9 volts minus 2.2 volts divided by 22 uA. This calculates to be about 300k. I used a 1 meg potentiometer so I can adjust this value for the proper collector voltage. If there is a problem with this arrangement, it would be caused by the input resistance of about 300k being in parallel with 100k which is 75k. This is lower than the 100k value we estimated we needed, but I thought it would be worth a try since our original assumption was just that, an assumption, or as you call it, an ROT. If it doesn't work on the bench, it is a simple thing to change the values and make them larger. However, since we can adjust the sensitivity, I am going to guess that I can adjust it to work."
Jack paused and went over to the spare chair and plopped into it. He was obviously proud of his accomplishment but not sure whether it would work or not. He then turned to Sam and said, "Are my assumptions correct, Do you think it will work?
Sam replied, "Jack, I wouldn't change a thing. My bet is that it will work right out of the box, as they say. If it doesn't it is obvious you know how to fix it. However, I wouldn't change R4 or R5 to increase the gain, I would just raise the input resistance by making R2 larger. Now how are you going to set it up for use once you get it built?"
Jack swung his rotating chair so that he was facing Sam, "Well, first I will hook up the 9 volt battery and use a test lead to clip the printed circuit board to the base of the Darlington. I don't care that this will introduce noise because I can adjust the sensitivity. Then I will use a voltmeter to measure the trigger voltage at pin 2 of the 555 to see the range of voltage at the collector. I will then adjust the potentiometer until the light and buzzer just come on. Now I can turn the potentiometer in the opposite direction until it they turn off. I will put some pennies on the circuit board and test it. If it works, then I am ready for my first victim." Jack smiled wickedly.
"Good plan," Sam replied as he began gathering things he needed to leave for the day, " I have two suggestions though. The first is to use a large capacitor across your 9 volt power source right where the battery enters the proto board to filter the supply to preclude circuit oscillation since you are operating at considerable gain. A 100 uF aluminum electrolytic capacitor should work fine. The second is to setup the circuit and adjust your system as close to a fluorescent light fixture as you can. The reason ...."
Jack interrupted before Sam could continue, "I know the reason! It's because you want it to be in a maximum 60 Hz noise environment!"
"Right on, complimented Sam as he walked toward the door. "I'll see you later. If you have problems just call me at home. I know you have a lab key and know where the parts are, so have at it." Sam looked at his watch, "He, still time for most of the last quarter," he mused, "thank goodness for advertisers. They always drag out a game."
Sam headed out the door for home and Jack bounded up the stairs, heading for the Lab. "See ya later," Jack shouted from the top step, "and thanks for the help."
"Glad to be of service," Sam shouted back, and then chuckled as he said, "I guess a little white fib is OK under these circumstances."
Sure enough by the time he had dropped by the main office and had fought the traffic home, the game was in the last few minutes of the last quarter. His team was behind 6 points and were on the opponents 10 yard line. He just sat down and was getting into the game when the phone rang. He let it ring as long as he dared. Fortunately, his team called a time out and he quickly reached for the phone.
"Oh no, I'll bet it is Jack and he can't get the circuit to work. I'll be tied up on this phone when time runs out. Why I chose teaching as a career I'll never know," he joked with himself." He then picked up the phone as he peered around the corner that partially blocked his TV view." Hello," he said with an impatient voice.
"It works, it works, it works," Jack shouted on the phone line so loud that Sam had to separate the earpiece about 6 inches from his ear, "wanna come see it? I didn't have to change a thing. It adjusted right into range, and at maximum sensitivity I don't even have to touch the coin before the LED lights and the buzzer sounds. I did find that 5 seconds is a long time for the buzzer to sound so I change R and C for an interval of about 2 seconds."
"Well it's great that it works and you were successful in modifying the circuit," replied Sam trying to muster up an equal amount of enthusiasm, "but I am occupied with another project." The TV speaker roared as his team scored as time ran out. "You've done a good job, I'll try to see it tomorrow."
Sam continued, "By the way, you may have to establish some ground rules for those playing your game, like they must use their bare fingers to pick up the coin and it is not acceptable just to use a fingernail to slide the coin from the touchpad."
"O.K." replied Jack, "Those are good ideas," He paused a second, "I need to go home and study for an exam anyway. See you tomorrow. I'm surely glad it works."
Sam placed the handset in the cradle and started for his easy chair. "Well, looks like there were two great victories today; my team and Jack's successful design. Maybe I can get as excited over the rehash of the game as Jack did over his working circuit."