|
|
Volume 3 No.4, Spring 2000 |
ISSN# 1523-9926 |
|
|
Volume 3 No.4, Spring 2000 |
ISSN# 1523-9926 |
Nicole Hoekstra
Assistant Professor
Engineering Technology Department
Western Washington University
ABSTRACT
Prior to rapid prototyping (RP), the depth to which students could analyze a design, product or process was limited due to the length of the academic quarter. Now, the Manufacturing Engineering Technology curriculum is able to further incorporate design, production, and testing in concurrent engineering and student projects. This paper discusses new developments in a Tooling for Plastics Processing course that focuses on the design and construction of injection molding tooling where the students investigated several methods of creating prototype tooling from RP models. Each method was evaluated for tool and part characteristics including surface finish, cycle time, cost, repeatability, and tool longevity. These methods can also be utilized in subsequent courses to create tooling and manufactured parts for design analysis and testing. Using RP, students are now better able to perform multiple iterations of production and testing of advancing designs using RP. The level of learning that occurs is dependent on two main things: how much iteration occurs and how well the results are analyzed and utilized in the next or concurrent step.
Introduction
Rapid Prototyping (RP) is a method
of fabricating a model directly from solid modeling software or a CAD file.
RP technologies such as Stereolithography (SLA), Selective Laser
Sintering (SLS), and Fused Deposition Modeling (FDM) deposit thermoplastic
powders or resins in thin layers to construct the model1. Designs for small parts can go from a CAD file to an actual
model in just a few hours. The
Engineering Technology department at Western Washington University recently
constructed a solid modeling laboratory and purchased rapid prototyping
equipment with a grant from an industrial partner.
Concurrent engineering practices are now being developed at all levels of
the curriculum.
In the plastics industry, concurrent
engineering is very important due to the high cost of tooling and long lead
times. Typically, concurrent
engineering is utilized by manufacturing prototype tooling early in the design
phase to analyze and adjust the design. Production
tooling is manufactured as the final step.
Beginning Winter quarter of 2000, the Tooling for Plastics Processing
course incorporated similar concurrent engineering practices.
The students in the class were divided into teams.
Each team chose a simple part design and a prototype mold construction
method. Each prototype mold
construction method used a rapid prototyped model to create the mold.
The RP models were created using the department’s FDM machine.
After completing the prototype molds, parts were manufactured using
injection molding. After part
analysis, the students updated the part design and the tool design.
Then a machined aluminum mold was produced using the new design to
manufacture additional parts. Parts
from the prototype tool and the machined tools were evaluated and compared.
The results from each team were compiled and a comparison of the
construction methods was completed.
Role of Rapid Prototyping and Prototype Tooling in the Curriculum
Producing rapid
prototype models for evaluation and testing is a topic of great interest in many
manufacturing industries. The
increase in RP technologies in the past decade has allowed manufacturers to
create RP parts that closely resemble the final part. These parts may then be used for fit and functionality
testing. The quantitative testing
of an RP model is very limited when the effect of the manufacturing process on
the part needs to be evaluated. This
includes such effects as material shrinkage, dimensional accuracy, and
anisotropic orientation of the material or when the design material is different
from the RP model material.
When the success of production
tooling depends on the accuracy of these tests, the parts that are being tested
must be of the design material and manufactured in a process that closely
resembles the final production process. To
lower the risk associated with construction of production tooling, the plastics
industry is employing prototype tooling to manufacture parts for evaluation and
testing2,3. One method
of constructing prototype tooling is simply casting aluminum-filled epoxy over
an RP model. To ensure that the
parts produced from prototype tooling closely resemble the final production
part, research is being performed to compare RP tooling to machined steel
tooling. In recent research, the
properties of parts produced in an RP epoxy tool were within 10-30% of parts
produced in a steel tool4.
Prior to the arrival of rapid
prototyping equipment in the department, the laboratory portion of the course
focused on the construction of tooling using manual and CNC machining.
Sometimes students only partially completed the assignment due to
complications during manufacturing of the tool.
These complications were usually attributed to the part design, the tool
design, or the machining program. With
this method of construction, there is generally not enough time, machining
resources, or operating budget for a second attempt.
Using RP models to speed the process
of creating tooling has three distinct advantages over the traditional method of
machining. The first is that the students get laboratory experience in
the design and construction of tooling with a shortened time requirement.
This allows for students to make two design iterations before the end of
the quarter. The first part design
is manufactured using a prototype mold, and the redesign is manufactured using a
machined mold. This methodology closely resembles the design process that is
used in industry. Due to the
advances in rapid tooling, many plastic part manufacturers create prototype
tooling to evaluate a design prior to machining the production tooling.
One of the major benefits of concurrent engineering is the ability to
uncover design defects early in the design process.
The cost incurred to correct a design flaw realized in the early stages
is a fraction of the cost of a defect that gets incorporated into the final
tooling. With the cost of
production tooling for injection molding ranging from $10,000 to $250,000 per
tool, a prototype tool is a wise investment.
Therefore, the second advantage is that knowledge of prototype tool
construction processes is becoming a necessity in an industry that has an
ever-increasing dependence on rapid tooling technology. The
third reason is due to the decreased cost, construction complexity, and
equipment requirements of prototype tooling.
With the traditional method of machining, only students in the CNC or
Tooling courses have adequate access to equipment and faculty to build molds. Now, students who have completed the Tooling class will be
able to build tooling to manufacture parts in subsequent courses in the
department without the dependence on CNC machining equipment.
The reduced time and equipment
requirement of the prototype mold construction methods can be used for many
other courses in the Engineering Technology department.
In addition to Senior Project and undergraduate research projects,
prototype tooling can be utilized in the Plastic Product Design, Computer
Integrated Manufacturing, and Foundry and Forming courses.
The Plastic Product Design course
focuses on the aspects of design that are particular to parts manufactured with
the primary production processes, specifically injection molding.
The course focuses on injection molding because it is the process that
allows for the most design freedom. Therefore
design practices learned are easily translated to other plastics processes.
In the laboratory portion of the Plastic Product Design course, the
students design products and fabricate models to evaluate the performance
characteristics by physical and thermal testing.
Often, these models do not perform as intended due to the disparity in
manufacturing methods and material used. Most
models are fabricated by casting, thermoforming, or machining.
Parts manufactured by injection molding will look and function different
than these fabricated models. Even
RP models do not perform well due to the layered structure of RP methods. RP
processes deposit thermoplastic powders or resins in thin layers to build a
part. The edges of the stacked
layers create a rough or stair-stepped surface.
The properties of RP parts are also anisotropic due to the layering.
In addition, the choice of materials used to build RP parts is very
limited. The students’ ability to
construct prototype molds will allow them to properly evaluate their designs
because the part was manufactured using the correct material and the same
process as the final production process.
In addition to many other topics,
the Computer Integrated Manufacturing course gives students an introduction to
Finite Element Analysis using ANSYS and Design Space.
This simulation software allows a student to model a part, load it with
multiple forces, and analyze the stress and strain that the part undergoes
during loading. For verification of
the results obtained from the FEA simulation, students can manufacture
transparent parts of their design and use polarized light to analyze the stress
concentrations under loading. The
transparent parts could be manufactured by injection molding resin into a mold
created by prototype mold construction methods.
In the Foundry and Forming course,
students are introduced to the different cast metal manufacturing methods,
including investment casting. Students
will be able to construct prototype molds for use with wax injection molding.
Wax parts can be injection molded and then ceramic coated.
These coated wax parts are placed in an oven and the wax is burned out,
leaving a hollow ceramic shell. The
ceramic shell is embedded in sand for support and molten metal is poured into
the ceramic shells.
Methodology
Because the emphasis of the course
was tool design and construction, the students were given a simple part design
to be manufactured by injection molding. The
students modeled the design using Rhino, Pro-E, or IDEAS.
Another facet of the tool design challenge is designing and creating a
mold base that will accept both the prototype cavity and the machined cavity
inserts. Constructing a single mold
base for both sets of inserts minimized the amount of manual machining required
for the project.
In
concurrent engineering, the process of part design evaluation and manufacturing
process evaluation leading to redesign is incorporated in many steps.
The procedure followed for this course utilized that idea in many ways.
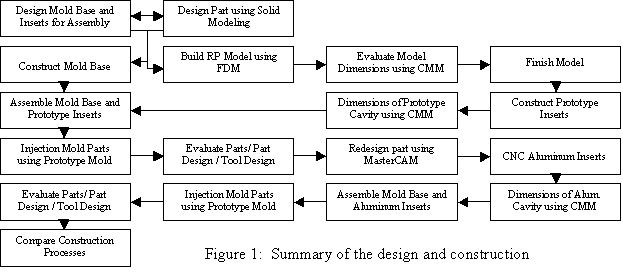
The process methodology is summarized in Figure 1.
Due to the dimensional changes that occurred to the design at each step
of mold construction, the students measured and evaluated each component after
it was produced. Adjustments were
made during the process to ensure proper dimensions of the final product.
After completing the prototype mold, the students injection molded parts.
Parts were produced until part quality began to diminish. The students then determined the cause and proposed methods
that could be used to either improve the quality of the parts or extend the life
of the tool. Evaluation of the
parts created with the prototype tooling allowed for modifications to the design
in the next phase, machined aluminum tooling.
After completing the machined aluminum inserts and assembling them into
the mold base, parts were injection molded.
These parts and the machined cavity were measured and evaluated.
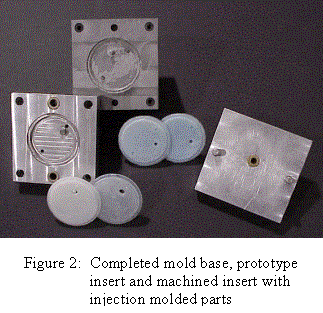
The parts manufactured by both molds were then evaluated for surface finish, dimensional accuracy, repeatability, functionality, mechanical properties, and level of crystallinity. Students evaluated the prototype construction method and machining method on such issues as cost, complexity, and limitations. The raw material cost, labor hours, machine hours, cycle time for each part, and the total construction time were included in the cost comparison. The success of each tool was also evaluated based on the complexity of the construction method compared to the skill level of the students. The prototype mold and the machined mold limitations were then discussed. These limitations included part size and complexity, the finish of the surface, dimensional accuracy, part functionality and the total number of parts produced. A completed mold base, prototype insert, machined insert and the respective parts that were molded from each insert are shown in Figure 2.
The Tooling for Plastics Processing
class was divided into teams. Each
team chose one construction method that best fit their part design.
For the more complex designs, two RP models were created. The parting line was used to divide the part into an A-side
RP model and a B-side RP model. Summary
descriptions of the methods are given below.
More detailed procedural information was obtained from many sources5,6,7.
Four molds were constructed by
casting aluminum-filled epoxy around the RP model in the bottom of a chase.
This method employed the simplest construction techniques, but was the
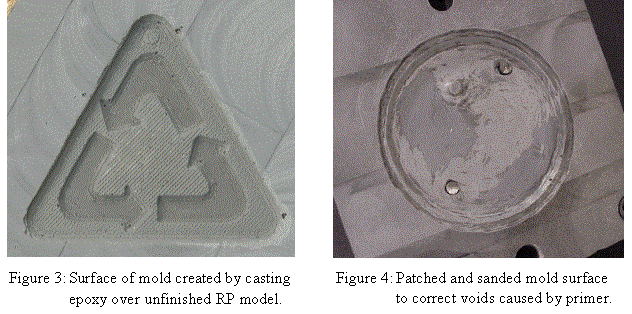
most difficult to obtain quality parts. Figure
3 illustrates the surface roughness caused by the layers in an unfinished RP
model and voids due to the epoxy. All
attempts to smooth the surface of the model using primer-fillers caused off
gassing and voids during the heat curing of the epoxy.
Many molds had to be resurfaced with epoxy filler, as shown in Figure 4.
The epoxy molds were not able to produce many injection-molded parts
before failure.
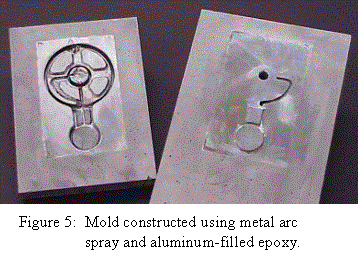
A more complex mold was built by
creating a shell over the RP model by spraying a thin layer of zinc using metal
arc spraying. A chase was built and
the shell was back-filled with aluminum-filled epoxy.
The surface quality and tool longevity was greatly increased over the
molds made with epoxy alone. Figure
5 shows the design complexity and the surface quality of the tool.
Investment casting was also used to
create two molds. Wax was cast
around the RP model in a chase. The
wax was coated with investment plaster and then the wax was melted out.
The plaster shells were placed in sand for support and aluminum was
poured in. Trapped gas and
imperfections in the wax model caused cavity imperfections that were translated
to the injection molded parts. The
investment cast tools had the most similarities to machined aluminum tools in
terms of durability, but had poor surface finish.
Conclusion
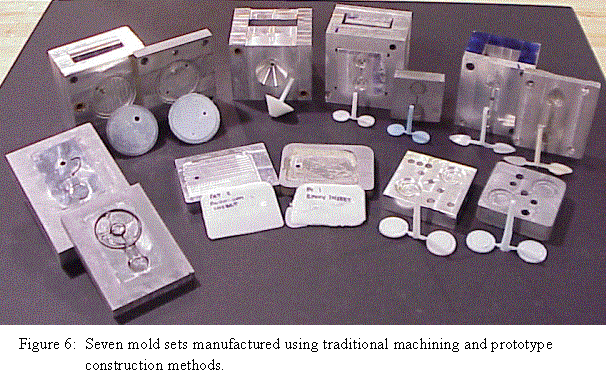
Seven mold sets were manufactured
and are shown in Figure 6 along with injection molded parts from each mold.
This study revealed that metal arc spray tooling is the preferred method
for mold construction of complex cavities.
The investment cast molds are durable, but have poor surface finish.
The epoxy molds were difficult to construct, have poor surface finish and
deteriorated quickly. Further study into these methods may find ways to improve
tool surface finish and longevity.
Using the results compiled from each
team, students who have completed the Tooling for Plastics Processing course are
better equipped to evaluate a design and determine which mold construction
method is best suited for an application. In
addition, students gained experience in mold design, construction, and
evaluation. They have also gained
an understanding of the use of prototype and machined tooling in the concurrent
engineering design processes.
ACKNOWLEDGEMENT
The author gratefully acknowledges
the support from The Boeing Company through the Collaborative Engineering Grant
that purchased the solid modeling software and hardware and the rapid
prototyping equipment.
REFERENCES
| 1. | Stratysis Web Site, http://www.stratysys.com |
| 2. | Aronson, R. B., “Toolmaking Through Rapid Prototyping”, Manufacturing Engineering, 11/98, pp. 52-56 |
| 3. | Frantz, J., “Rapid Tooling Alternatives for Plastic Injection Molds”, Moldmaking Technology, 8/99, pp. 25-34 |
| 4. | Polosky, Q. F., R. Malloy, R. Stacer, “A Mechanical Property Performance Comparison for Plastic Parts Produced in a Rapid Epoxy Tool and Conventional Steel Tooling”, SPE ANTEC Conference Proceedings, 1998, pp. 2972-2976 |
| 5. | Hansel, B., “Fundamentals of Product Development, Getting to Market in Half the Time”, SPE ANTEC Conference Proceedings, 1998, pp. 3080-3083 |
| 6. | Burns, D. T., R. A. Malloy, S. P. McCarthy, “Analysis of Metal Coating Effects on Stereolithography Tooling for Injection Molding”, SPE ANTEC Conference Proceedings, 1998, pp. 888-891 |
| 7. | Ashley, S., “From CAD art to rapid metal tools”, Mechanical Engineering, 3/97, pp. 82-87 |
| 8. | Hoekstra, N. “Tool Design and Concurrent Engineering using Rapid Tooling Construction Methods“, ASEE Annual Conference Proceedings, 2000 |